Tiny original paintings are the perfect, affordable way to collect beautiful artwork to fill your walls. It can be tempting to think your postcard-sized paintings are destined to become puny desktop jewelry at best, but I'm going to show you five ways to make small artwork shine with affordable framing solutions you can (mostly) do yourself.
1. Art History Method

2. Reversed Mat Method

Any frame style you like can work with this slightly more subdued but still beautiful method- the trick is using a slightly larger frame opening and layering the painting on top of the mat to add dimension with multiple borders. If you make the opening larger than the painting (get a 5x7 inch frame for a 4x6 inch painting), the painting will look much larger and the edge will be exposed, which is especially beautiful for papers with deckled edges. For extra oomph, place paper or mat in a contrasting color behind it and place some thick adhesive squares behind the painting to create depth. I love the curved lines of this golden garage sale find (it just so happened to have the perfect green mat already inside!), but you can experiment with all sorts of mat colors and frame styles. If you have any paint on hand, you can even refinish the frames you find to suit your décor.
3. Pressed Glass Method

Pressed glass frames create a vintage vibe I’m in love with, especially since it leaves the poems on the backs of these paintings visible. Going for either a sculptural free-standing or hanging frame in a larger size than the painting leaves a nice border around the paper while keeping things understated and elegant. You can even layer pressed flowers, leaves, or feathers in the extra space around the paper for a Victorian herbarium look.

4. Fitted Wide Mat Method

5. Extra-Wide Floating Mat Method

frame backing
+
blank paper that matches the mat
+
mat with large opening
+
mat with 5x7 opening
+
thick adhesive squares or cardboard
+
painting
+
glass
+
frame
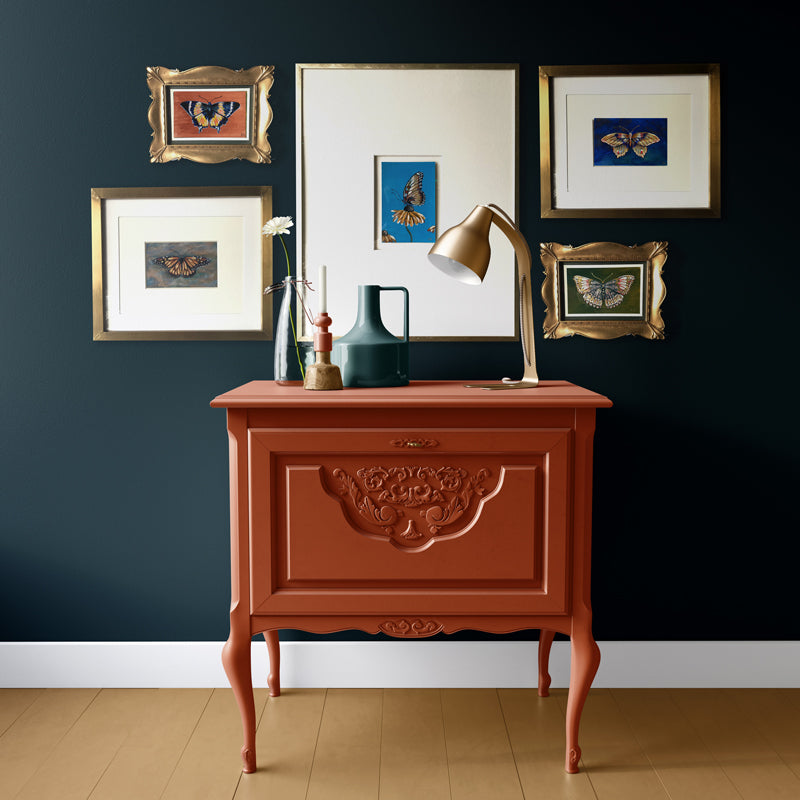
Gallery Wall

To re-create this gallery wall, you'll need one 16x20 inch frame, two 11x14 inch frames, and two 5x7 inch frames. Simply center a vertical 16x20 inch frame on a wall at eye level, and add a horizontal 5x7 inch frame to each side, one aligned to the top and one aligned to the bottom. Then, add an 11x14 inch horizontal frame (an 8x10 will work too- just add more space between the frames) to each side in the remaining space, and it's done! Depending on the width of your frames, you may want to play around with spacing between them. Lay it all out on a floor or bed before you start hammering so you can adjust the frames and get an idea of how much spacing you'll need. I usually just eyeball things (which is probably why I have so many holes in my walls :) but for the perfectionists out there, you can measure and mark things once you have it laid out on the floor.
Feel free to experiment with different shapes, colors, and frame finishes— no need for it to be symmetrical! I'll do a gallery wall tutorial showing different configurations in the future, but this should get your wheels turning
Thanks for joining me on this DIY framing adventure—I hope it was helpful and that your walls will soon be brimming with tiny original paintings! To start off or add to your collection, check out what poetry postcard paintings I have available here or use hashtags to search Instagram for tiny original paintings from amazing artists across the globe.
Happy Framing!